


 4.9
4.9 4.5
4.5Audiences form credibility judgments within seven seconds of watching a speaker, based on posture, gestures, and facial expression alone. This guide gives you six concrete practice sessions, about 20 minutes each, that rebuild your delivery from breathing mechanics through vocal control and body language, with a checkable outcome at every step.
TL;DR: Record yourself to establish a baseline, fix your breathing, cut filler words in half, build vocal variety, sharpen body language, and ditch the script for keyword notes. Six sessions, two hours total, each with a measurable result before you move on.
Before You Start
You need three things before session one:
- A smartphone or laptop with a camera. You’ll record every single session. Watching your own recordings is the engine that drives improvement.
- A short talk topic you already know well. A project update, a team introduction, even a recipe you’ve made fifty times. Don’t pick something new, the point is to isolate delivery from content creation.
- About two hours total, spread across a week or more. Cramming all six sessions into a single afternoon defeats the purpose. Your body and brain need repetitions spaced apart to build new habits.
No special equipment required. No audience yet. Every step happens solo until the troubleshooting section at the end, where you start testing in low-stakes real settings.
Step 1: Record Your Baseline
Goal: See and hear yourself the way your audience does.
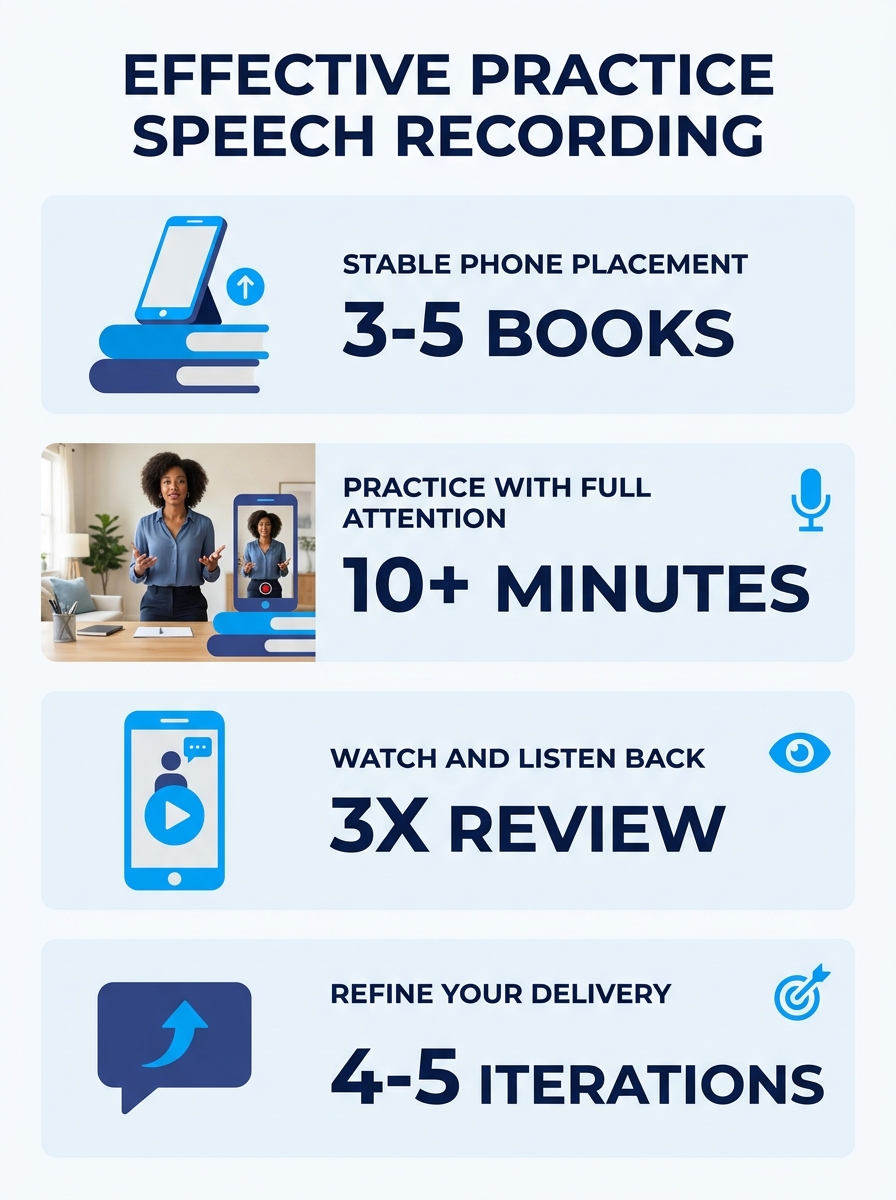
Set your phone on a shelf or stack of books so the camera captures you from the waist up. Stand, don’t sit. Deliver your chosen topic for 2–3 minutes without stopping. Don’t rehearse first. The messiness is the data.
Watch the recording once with sound. Watch it again on mute (this isolates your body language from your words). Then listen to the audio only with the screen turned away.
Write down three specific observations about what you see and hear. Not “I look nervous”, that’s too vague to act on. Write things like: “I touched my face four times,” “I said ‘um’ after every other sentence,” “My voice dropped at the end of every point,” or “I swayed from side to side for the entire two minutes.”
You’ll know it worked when you have three concrete, observable habits written down. These become your targets for the next five sessions.
Step 2: Fix Your Breathing and Posture
Goal: Establish diaphragmatic breathing and a stable standing posture before layering any other delivery skill on top.
The Mayo Clinic’s advice for public speaking anxiety is direct: take two or more deep, slow breaths before you begin speaking and again during your speech. Anxiety peaks at the start of a presentation and typically settles within a few minutes, but shallow chest breathing keeps your body locked in fight-or-flight mode. Diaphragmatic breathing breaks that cycle.
Here’s the practice sequence:
- Place one hand on your chest and one on your stomach.
- Inhale through your nose for a count of four. Your stomach hand should move outward. Your chest hand should barely move.
- Exhale through your mouth for a count of six.
- Repeat ten times before you start speaking.
As Edinburgh Public Speaking Training notes, “Breathing deeply from your diaphragm gives you greater control over your voice, allowing it to resonate more powerfully. Proper posture also supports a stronger, more confident voice.” For posture: stand with your feet shoulder-width apart, weight distributed evenly, spine straight, shoulders back and relaxed. Standing tall with your spine straight exhibits stability and confidence, and the physical position genuinely changes how secure you feel internally.
Now re-record your 2–3 minute talk with this breathing and posture in place. Set the recording side by side with your baseline.
You’ll know it worked when your voice sounds noticeably steadier in the second recording and you can see a visible difference in how grounded and stable your stance looks compared to session one.
Step 3: Cut Your Filler Words in Half
Goal: Reduce “um,” “uh,” “like,” “so,” and “you know” to roughly 50% of their current frequency.
Dr. Michael DeGeorgia of Case Western University Hospitals explains the brain mechanism behind filler words: when anxiety spikes, the prefrontal cortex, responsible for sorting memories and organizing speech output, becomes less efficient. Stress hormones compound the problem, and your brain starts buying time with filler sounds while it catches up to what you want to say.
The fix is replacement, not willpower. Instead of filling silence with “um,” you practice pausing. A one-second silence between sentences feels eternal to you, the speaker. To your audience, it sounds confident and deliberate. Research on conversational pacing suggests a rate of about 125 words per minute gives speakers enough processing time to form thoughts without rushing into fillers.
Practice drill:
- Record your talk again with the posture and breathing from Step 2.
- Every time you catch yourself about to say a filler word, stop talking. Close your mouth. Take a breath. Then continue.
- Count the filler words in your baseline recording and in this new one. You’re aiming to halve the number, not eliminate fillers entirely.
You’ll know it worked when your filler word count drops measurably between recordings and you can identify at least two moments where you paused instead of saying “um.”
Tip: Don’t try to eliminate every filler word. An occasional “um” sounds human. The problem is density, when filler words appear every other sentence, they erode your credibility and signal you’re unsure of your material. Halving your count is a bigger perceptual shift than you’d expect.
Step 4: Build Vocal Variety
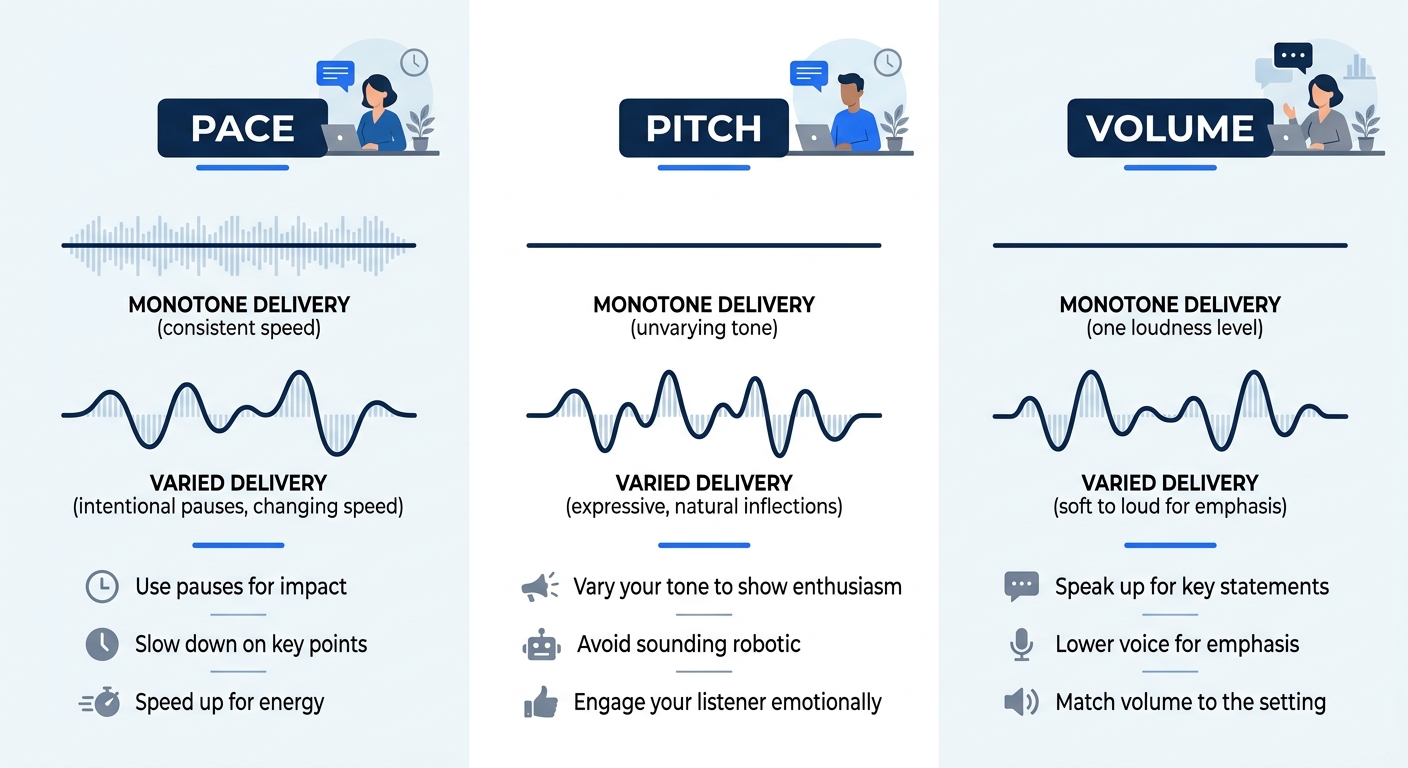
Goal: Vary your pace, pitch, and volume intentionally so your delivery doesn’t flatline into a monotone.
Research on speaker perception shows confident speakers demonstrate 22.6% more vocal passion than nervous ones, and that passion registers through three measurable variables: speed changes, pitch shifts, and volume dynamics. Monotone delivery kills attention faster than weak content does, because a flat voice signals to the listener’s brain that nothing important is coming.
Pace: Pick one sentence in your talk that contains your most important point. Slow it down to about half your normal speed. Speed up slightly during supporting details and transitions. The contrast, fast on context, slow on conclusions, tells your audience exactly where to pay attention.
Pitch: Read two sentences of your talk as though they’re questions (your pitch rises). Read them as commands (pitch drops). Now read them as neutral statements with natural inflection. The goal here is to feel the range available to you. Many speakers, especially when nervous, lock into a narrow pitch band that sounds like a drone after 30 seconds.
Volume: Practice one sentence at whisper volume, one at conversation volume, one at “calling someone across a room” volume. A strategic volume drop right before a key point actually pulls an audience in harder than raising your voice does.
Record your talk with these variations deliberately built in. It will feel theatrical at first, that’s normal and expected. When you watch the recording, you’ll almost certainly find it sounds far more natural than your monotone baseline did.
You’ll know it worked when you can hear at least three intentional pace, pitch, or volume shifts in your recording and the overall delivery sounds less flat than your previous sessions.
Step 5: Sharpen Your Body Language and Eye Contact
Hamilton College’s delivery framework centers on what they call the 3 Es of effective delivery: Energy, Eye Contact, and Expression. All three are physical skills, and all three require specific practice. The commonly heard advice to “just act natural” falls apart the moment you face an audience. Being watched by a group of people is an inherently unnatural situation, and your unconscious habits, crossing your arms, swaying, avoiding eye contact, fidgeting with a pen, will take over unless you’ve built deliberate alternatives.
Jesse Scinto, DTM, a professor of strategic communication at Columbia University and a Toastmasters member, identifies three distinct categories of hand gestures that should be used selectively based on intent: illustrative gestures (showing size, shape, or direction), emphatic gestures (reinforcing a point with a decisive movement), and prompting gestures (inviting audience response). Most untrained speakers default instead to repetitive self-soothing movements that communicate anxiety rather than confidence.
Gesture drill:
- Deliver your talk with your hands at your sides. No gestures at all. This feels deeply awkward, and that awkwardness is the point, it forces you to become conscious of what your hands usually do on autopilot.
- Deliver it again, adding one deliberate gesture per sentence. Open palms when presenting an idea. A single pointed finger when making a direct claim. Hands spread apart when describing something large or expansive.
- Record both versions. Compare them.
Eye contact drill:
Place three objects around the room at different heights and angles, a lamp, a book on a shelf, a chair. Each represents an audience member. Hold eye contact with each “person” for a full sentence (3–5 seconds) before moving to the next. Sweeping your gaze across the room without landing on anyone creates the illusion of eye contact without the actual connection, and audiences can feel the difference.
Being watched by a crowd isn’t a natural situation. Your unconscious habits will take over unless you’ve built specific alternatives through deliberate practice.
The same body language skills transfer directly to interview settings. If you’ve been working on preparation for leadership-focused interviews, the work you do here, steady eye contact, open posture, controlled gestures, applies in those conversations with the same force.
You’ll know it worked when your recording shows you holding eye contact with each “person” for a full sentence and using at least two different types of intentional gesture rather than repetitive fidgeting.
Step 6: Ditch the Script for Keyword Notes
Goal: Deliver your talk from sparse keyword notes rather than a full written script, using extemporaneous delivery.
This is where the previous five steps converge into something that looks and feels like a real presentation. The University of Nevada, Reno’s Writing & Speaking Center describes extemporaneous speaking as having “no ties to a manuscript,” which creates “flexibility in structure.” That flexibility is exactly what lets you do what Harvard DCE recommends: “Keep the focus on the audience. Gauge their reactions, adjust your message, and stay flexible. Delivering a canned speech will guarantee that you lose the attention of or confuse even the most devoted listeners.”
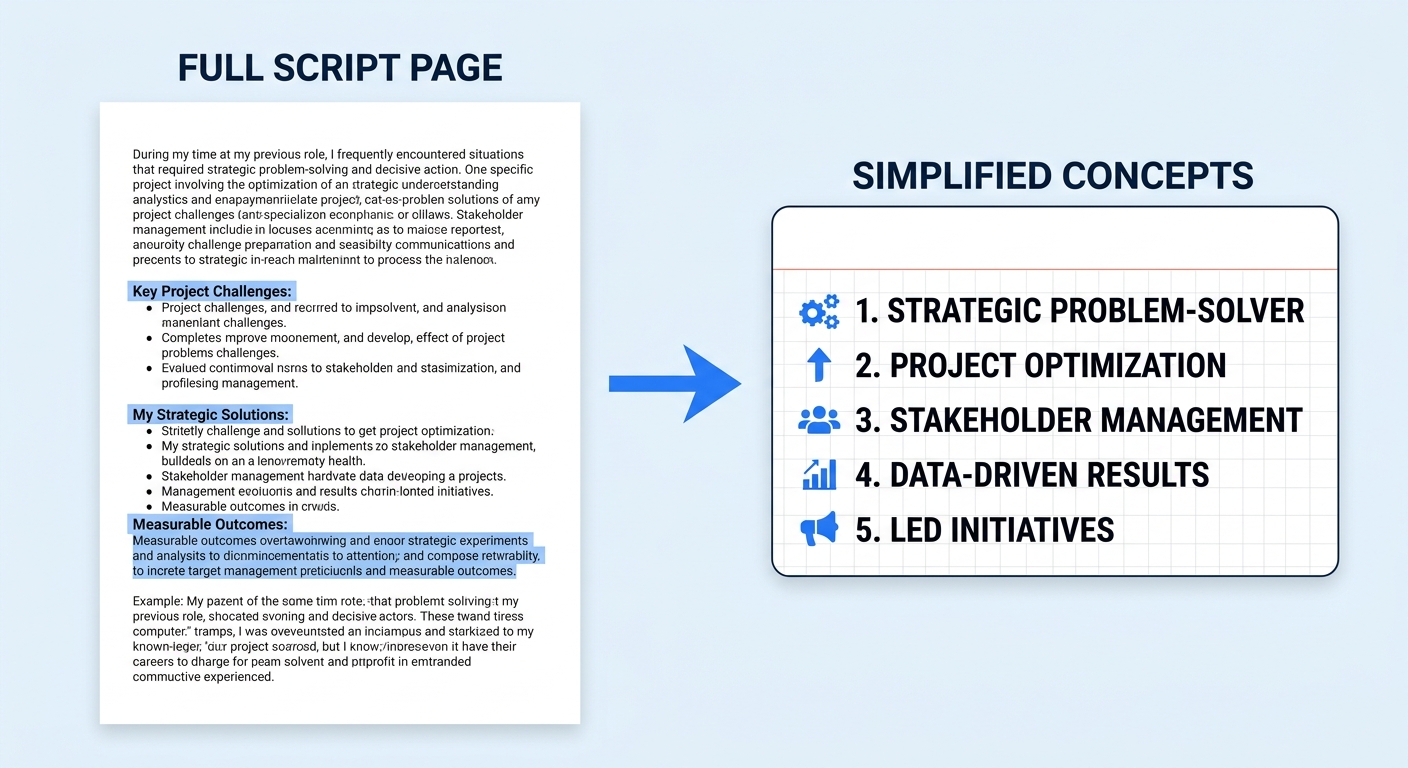
A full script handcuffs you to the page. You read instead of connecting. You lose your place and panic. Your eye contact vanishes because you’re staring at paper. All the work from Steps 2–5 evaporates when your eyes are glued to a document.
How to build keyword notes:
- Write out your full talk one final time.
- Reduce each paragraph to a single phrase of 3–5 words that captures the core idea. “Revenue up 40% in Q2” instead of the full paragraph about revenue growth.
- Write these phrases on one index card or one slide’s worth of bullet points. Use text large enough to read at arm’s length with a quick glance.
- Deliver your talk from these notes alone. You’ll stumble on the first attempt. Deliver it again. By the third run-through, your own phrasing will feel more natural than anything you scripted.
A useful trimming principle from the University of Nevada’s research: wherever you catch yourself saying “due to the fact,” say “because.” Wherever three sentences set up a single point, try one. Extemporaneous delivery rewards concision because you’re generating language in real time rather than reading pre-written prose.
Research on audience engagement also shows that using inclusive language, “we” and “our” instead of “I” and “my”, boosts audience involvement by nearly 47%. Adjust your keyword prompts to cue collaborative framing where it fits naturally.
You’ll know it worked when you can deliver your full talk looking at your notes fewer than five times while maintaining the breathing, posture, vocal variety, and body language from the previous sessions.
When Things Go Wrong
Your anxiety gets worse during recorded practice
The camera acts like a silent, judgmental audience. The National Social Anxiety Center describes the core fear well: “The prospect of having an audience’s attention while standing in silence feels like judgment and rejection.” If recording yourself triggers significant anxiety, start with audio-only recordings for the first two sessions. Add video once audio-only feels routine. The gradual exposure matters more than powering through panic.
You improve in practice but revert in real settings
The gap between practice and performance closes with repetition across contexts, not with more solo rehearsal. Give your practiced talk in a low-stakes real setting, a team standup, a conversation with a friend, a five-minute volunteer slot at a meetup. The same principle applies when you’re preparing for professional interview scenarios: structured practice in safe environments builds the muscle memory that transfers to high-pressure moments.
You can’t hear your own filler words
This is surprisingly common, your brain edits them out in real time. Ask someone you trust to watch one recording and tap the table every time they hear a filler word. You can also run speech-to-text transcription on your phone. Many filler words show up in the transcript text, making them countable and concrete rather than invisible.
Where to Go From Here
These six sessions build a delivery foundation that works whether you’re presenting quarterly results to an executive team, pitching a project, or answering behavioral questions in an interview. If you’re also refining how you present yourself on paper, the same principles of concision and confidence apply in written form, too.
Your next move is adding a real audience. Join a local Toastmasters chapter, volunteer for a five-minute slot in your next team meeting, or offer to run a short lunch-and-learn on something you know well. The structure from these six steps gives you a repeatable warm-up sequence you can use before any speaking opportunity: record, review three specific observations, practice corrections, record again. Each real-world presentation becomes another data point, another recording to analyze, another iteration. The speakers who improve fastest aren’t the ones who started with natural charisma, they’re the ones willing to watch their own recordings honestly and change one specific thing at a time.