

 4.9
4.9 4.5
4.5This guide walks you through the formatting of a cover letter from blank document to finished PDF in about 20 minutes. You’ll set 1-inch margins, pick a 10–12 point font, build six distinct sections, and export a file that passes ATS screening without mangling your layout.
TL;DR: Set your document to 1-inch margins on all sides, use a single standard font at 10–12 points, structure six sections (contact header, date, salutation, opening paragraph, body, closing), keep total length to 250–400 words on one page, and always save as PDF unless the employer specifically asks for a Word file.
Before You Start
You need three things before touching the document: a word processor (Google Docs, Microsoft Word, or LibreOffice all work), the full job posting open in another tab, and the hiring manager’s name. If you can’t find a name, LinkedIn or the company’s team page will usually surface it in under 5 minutes. The job posting matters because every formatting decision you make should serve a single goal: getting a human to read your 250–400 words after the ATS has already parsed them.
You’ll also want your resume file open. MIT’s Career Advising & Professional Development office states that “a cover letter should be no longer than one page with a font size between 10-12 points,” and matching your resume’s font family to your cover letter creates visual consistency across your application package. If your resume uses Calibri at 11 points, your cover letter should use Calibri at 11 points.
Time required: 15–25 minutes for formatting alone, assuming you’ve already drafted your content.
Step 1: Create the Page Layout
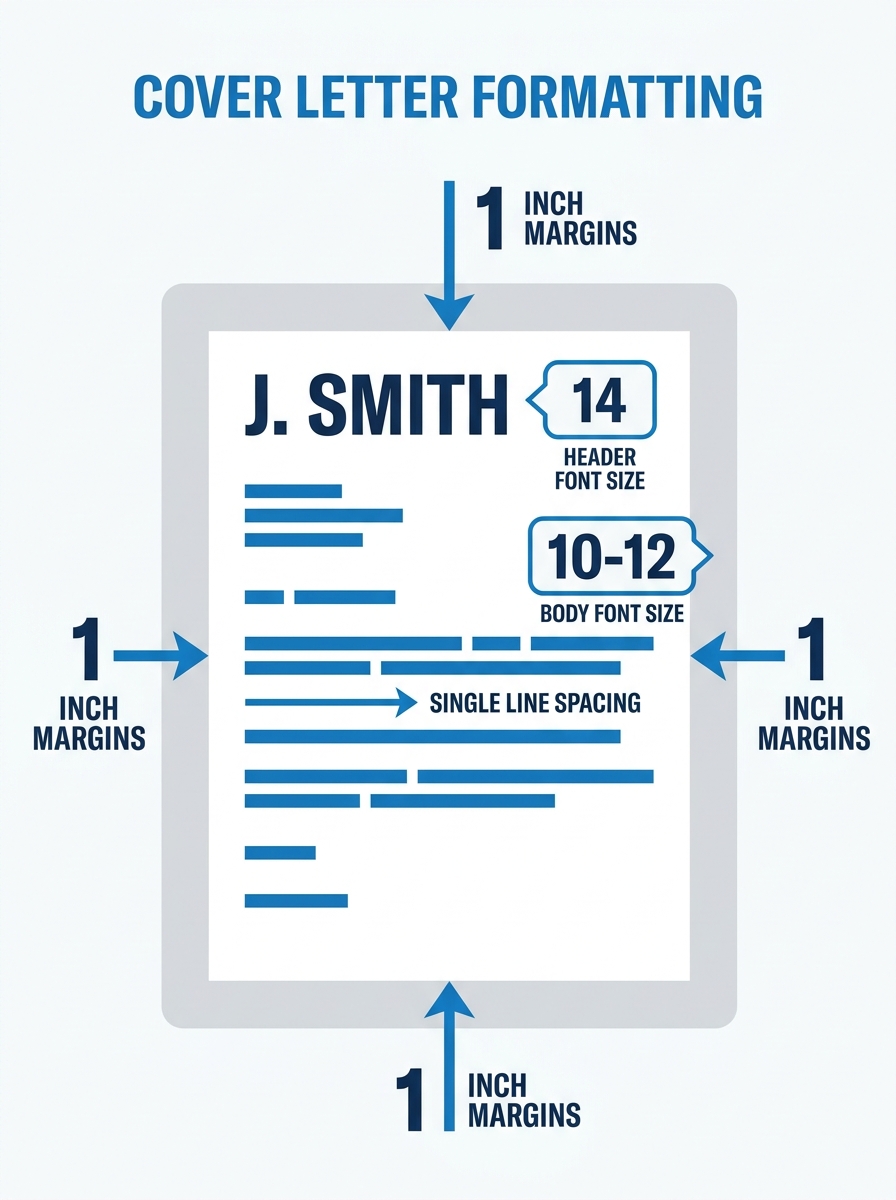
Open a new blank document. Set all 4 margins to exactly 1 inch: top, bottom, left, and right. Purdue OWL’s formatting guidelines confirm that 1-inch margins are the standard for professional correspondence. In Google Docs, go to File → Page Setup and type “1” into each margin field. In Word, it’s Layout → Margins → Normal (which defaults to 1 inch on all sides).
Set line spacing to single (1.0) within paragraphs. Then set your “after paragraph” spacing to 0 points so you can control blank lines manually.
Pick one font and one size for the entire body. The safe choices: Arial, Calibri, Times New Roman, or Garamond. Set it to 10, 10.5, 11, or 12 points. Grammarly’s cover letter guide recommends sticking with “standard fonts like Times New Roman or Arial” because complicated layouts and unusual typefaces confuse ATS software and can render your data unsearchable.
You’ll know it worked when: your document shows 1-inch margins on all sides, single spacing, and a clean standard font. Print preview should show wide white margins framing the text area.
Step 2: Build Your Contact Header
Your name goes at the very top. Set it to 14-point bold in the same font family as your body text. Directly beneath your name, add your contact details on 1–3 lines: phone number, professional email address, city and state (full street address is optional and increasingly omitted), and your LinkedIn URL if it’s complete.
If you’re applying to a role in tech, the header is also where a GitHub or portfolio link belongs. Finance and government roles typically expect a full mailing address, so adjust accordingly.
Keep everything left-aligned. Avoid centering your header unless your resume header is also centered and you’re deliberately matching the visual style. Resist the temptation to add decorative lines, icons, or color blocks. Indeed’s formatting guide specifically notes to “add a blank line between paragraphs and each major section,” and that clean separation does more visual work than any design element.
You’ll know it worked when: your header contains 3–5 lines of contact information beneath a bold name, all left-aligned, with a single blank line separating it from the next section.
If you’ve already worked through our complete cover letter structure guide, this header section will look familiar. The formatting principles carry over directly.
Step 3: Add the Date Line and Employer Address
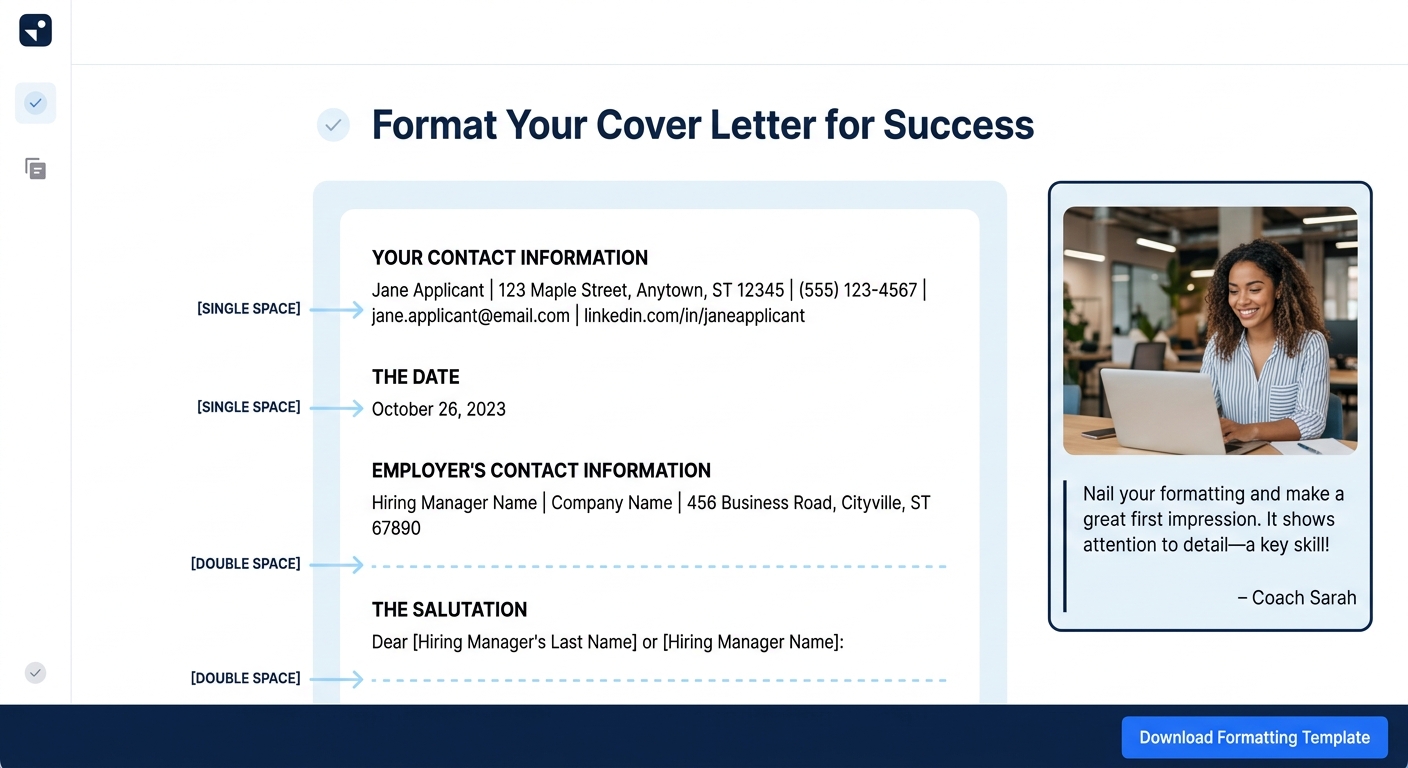
Hit Enter twice after your header to create one blank line of separation, then type the full date. Use a formal format: “September 22, 2026” rather than “9/22/26.” This detail matters in formal business correspondence and many hiring managers notice its absence.
Below the date, add another blank line, then type the employer’s address block on 3–4 lines:
- Hiring manager’s full name
- Their title
- Company name
- Company address (city, state, zip)
This block is the piece most applicants skip when emailing applications. Skip it for email-body submissions (more on that in Step 7), but include it for uploaded PDF attachments and mailed letters. Government applications almost always expect it.
You’ll know it worked when: the date sits one blank line below your header, and the employer address block sits one blank line below the date. The visual rhythm is: header → space → date → space → address → space → salutation.
Step 4: Write a Personalized Salutation
Type “Dear [First Name] [Last Name],” followed by a comma. If you’ve confirmed the hiring manager’s title and preference, “Dear Ms. Rodriguez,” or “Dear Dr. Park,” works. Avoid “To Whom It May Concern” and “Dear Sir/Madam,” both of which signal that you didn’t research the role. A targeted salutation tells the reader you’ve done the 5 minutes of homework that most applicants don’t bother with.
If you genuinely cannot find a name after checking the job posting, the company website, and LinkedIn, use “Dear Hiring Manager,” or “Dear [Department Name] Team,”. These are neutral and professional without sounding like a form letter.
Add one blank line after the salutation before starting your first body paragraph.
You’ll know it worked when: the salutation addresses a specific person by name, ends with a comma, and is followed by one blank line.
Writing the Body in Three to Four Paragraphs
The body is where formatting discipline prevents the most common mistake: going over one page. Target 3–4 paragraphs totaling 250–400 words. Each paragraph should run 3–5 sentences, and you should leave one blank line between each paragraph.
Paragraph 1 (Opening): State the exact position title and where you found the listing. Name one specific reason this company interests you. This paragraph should be 2–3 sentences and no longer than 50 words.
Paragraph 2 (Skills and Evidence): Match 2–3 of your strongest qualifications to specific requirements from the job posting. Use numbers where possible: “reduced onboarding time by 30%” is stronger than “improved onboarding.” If you want to avoid the generic phrases that hiring managers filter out, ground every claim in a measurable outcome.
Paragraph 3 (Company Knowledge): Show that you understand what the organization does and why your skills solve a problem they have. This paragraph bridges your experience to their needs.
Paragraph 4 (Call to Action): Optional. If your letter is running short (under 200 words), fold this into paragraph 3. If you include it, keep it to 1–2 sentences expressing enthusiasm for an interview and referencing your availability.
Tip: Run a word count before moving on. If you’re above 400 words, cut the weakest sentence from each body paragraph until you’re in range. ATS systems don’t penalize length, but recruiters spending an average of 6–7 seconds on initial screening do.
You’ll know it worked when: your body paragraphs total 250–400 words, each paragraph is separated by one blank line, and no paragraph exceeds 5 sentences.
A cover letter that runs 400 words with 1-inch margins and 11-point Calibri will fill roughly 60–70% of the page, leaving comfortable white space that signals confidence and editing discipline.
Step 6: The Closing and Signature Block
After your final body paragraph, leave one blank line and type your complimentary close. Appropriate options include “Sincerely,” “Best regards,” or “Thank you,”. Each ends with a comma. Avoid “Cheers,” “Warmly,” or “Respectfully yours,” unless the industry culture specifically calls for it.
If you’re printing and mailing the letter, leave 3–4 blank lines after the complimentary close for a handwritten signature in ink. Purdue OWL’s guidelines note that you should “sign your name in ink between your complimentary close and typed name.”
Below the signature space (or immediately below the close for digital submissions), type your full name. Match the formatting of your header name: same font, same size. Some applicants bold their closing name at 14 points to mirror the header, which creates a clean visual frame for the page.
You’ll know it worked when: the closing reads “Sincerely,” followed by either a signature space (printed) or an immediate typed name (digital), with formatting that mirrors your header.
Step 7: Save, Export, and Send
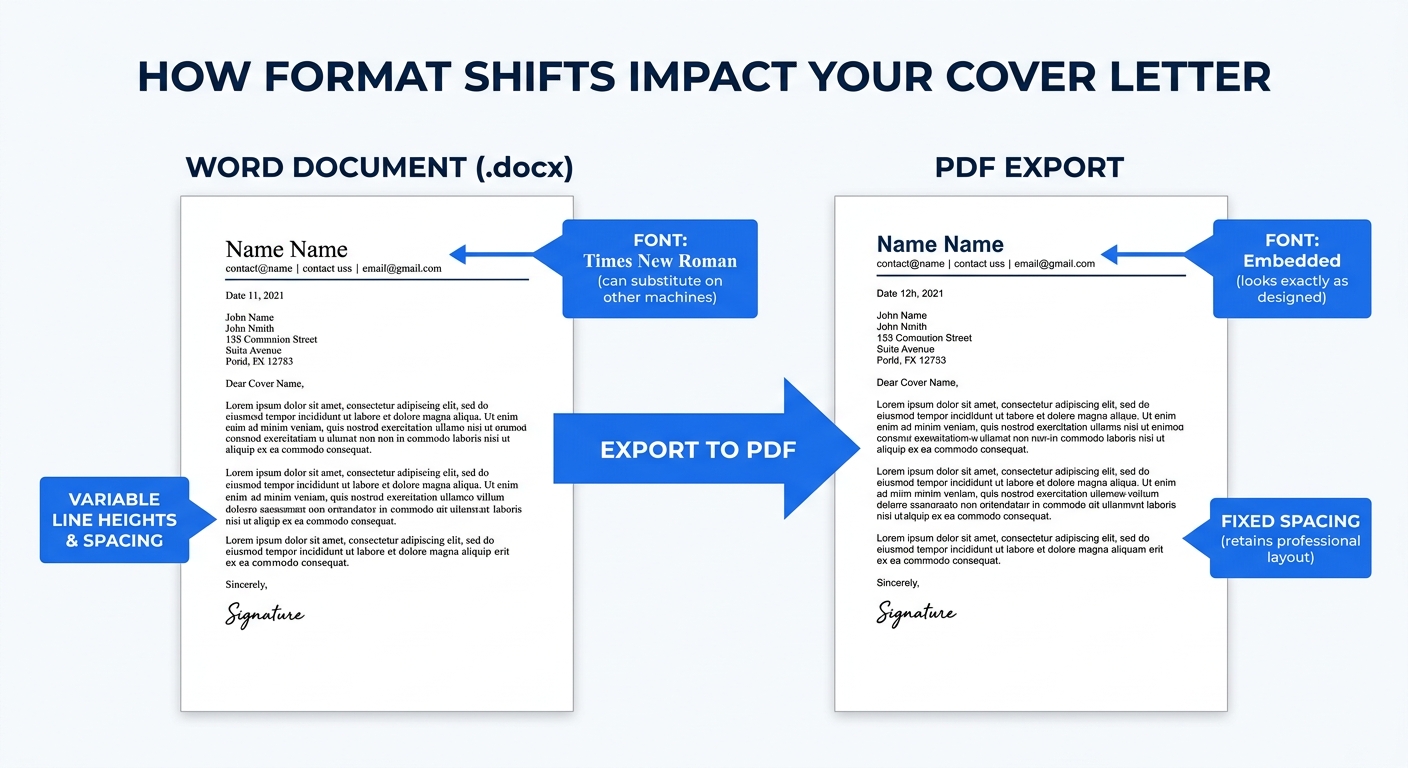
Save your document as a PDF. This is the single most important formatting preservation step. PDFs lock your margins, fonts, spacing, and layout so that the hiring manager sees exactly what you designed, regardless of what word processor or operating system they’re using. The only exception: if the job posting explicitly requests a .doc or .docx file, honor that request.
Name the file clearly: FirstName-LastName-Cover-Letter.pdf. Avoid generic names like “cover letter.pdf” or “document1.pdf.” Hiring managers download dozens of files per day, and yours needs to be findable in a folder.
For email-body submissions (when the posting says “paste your cover letter in the email”), remove the date line and employer address block. Place the job title and your name in the subject line: “Jane Park – Marketing Manager – Application.” Keep the salutation, body paragraphs, and closing intact.
You’ll know it worked when: you can open the PDF on a different device (your phone, a friend’s laptop) and the layout looks identical to what you designed.
If you want to start from a proven structure rather than building from scratch, our collection of ready-to-use cover letter templates gives you a pre-formatted starting point.
Troubleshooting the Three Most Common Breaks
The letter spills onto page 2. Your word count is above 400 or your font size is above 12 points. Cut your weakest body paragraph down to 3 sentences, reduce font size to 10.5, or tighten margins to 0.75 inches (but no narrower, or the letter will look cramped). Check that your “after paragraph” spacing isn’t set to 8 or 12 points, which adds invisible vertical space.
The ATS scrambles your header. Text boxes, tables, columns, and graphics inside the header are the usual cause. Rebuild the header as plain text lines, left-aligned, with no formatting containers. According to Grammarly’s formatting guide, you should “avoid images or page decorations” and “stick with simple layouts” because complicated structures confuse ATS and render your information unsearchable.
Fonts change when the recipient opens the file. This happens when you use a non-standard font and send a .docx instead of a PDF. The recipient’s computer substitutes a default font, which can shift line breaks, spacing, and page length. The fix is always the same: export as PDF. If you must send a Word file, stick to fonts installed on every major operating system: Arial, Times New Roman, Calibri, or Verdana.
For a deeper walkthrough of cover letter formatting best practices including ATS-specific adjustments by industry, that guide covers edge cases we’ve skipped here.
Where to Go From Here
With your formatting locked down, the structural decisions are behind you. The work that separates a good cover letter from a forgettable one happens inside those 250–400 words: matching your experience to the job’s specific requirements, proving you’ve researched the company, and writing with enough clarity that a recruiter scanning for 6 seconds finds a reason to keep reading.
If you haven’t drafted your content yet, our format-of-a-cover-letter guide breaks down what to write inside each section. And if you’re tailoring the same base letter across multiple applications, set up a master template with placeholder brackets (like [COMPANY NAME] and [SPECIFIC SKILL]) so you can swap details without accidentally sending the wrong company name. That particular mistake shows up in hiring manager surveys as one of the fastest disqualifiers, and a good template makes it nearly impossible.